Superstack IoT Platform
Active
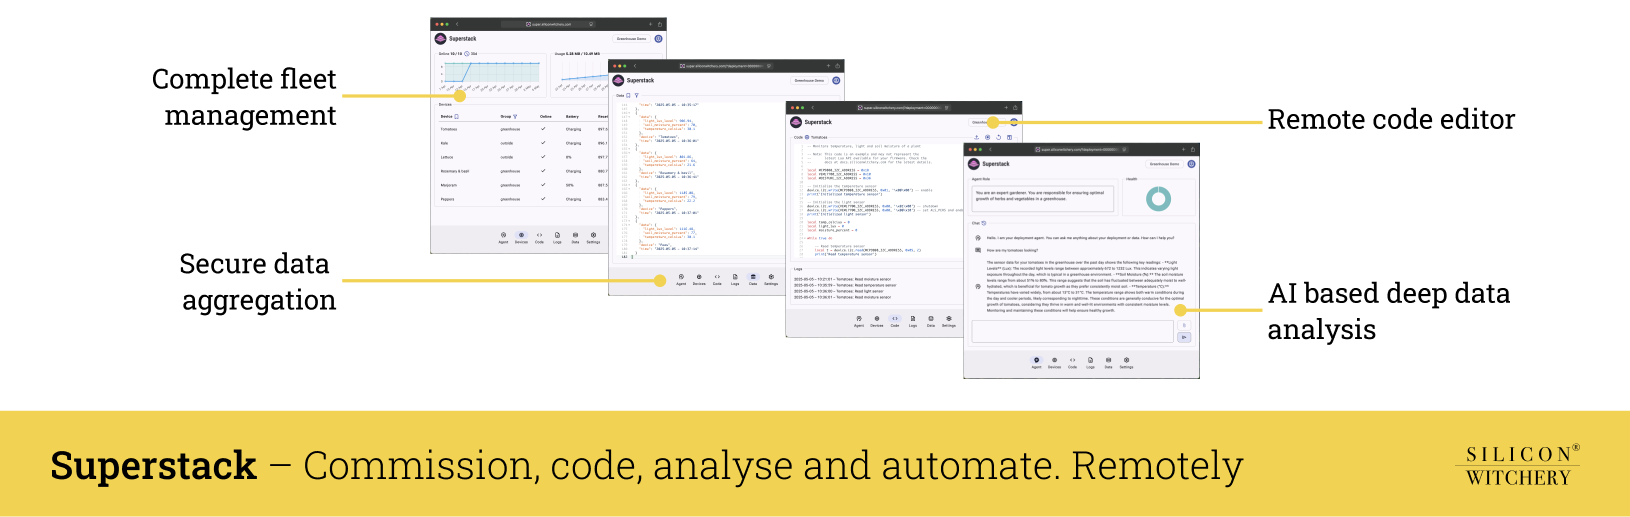
Superstack is a cloud IoT platform that lets you deploy, program, and manage connected devices from anywhere. You can update firmware, monitor data in real-time, and run AI-powered analytics, all through a secure web dashboard or API. Superstack handles connectivity, Device onboarding, and fleet management, so you can focus on building your application. Its natural language query engine and easy business integration make it simple to turn raw device data into actionable insights at scale.
Contents
- Connecting your first module
- Deployment tab
- Devices tab
- Code tab
- Logs and Data tab
- Agent tab
- Settings
- API
- Troubleshooting / FAQ
Connecting your first module
To connect an S2 Module to Superstack:
- Create or select a Deployment that you wish to add the Device to
- Navigate to the Devices Tab within Superstack
- Press Add device
- Power on your Device using either USB, battery, or external power
- Wait until the network LED stops blinking and goes solid, indicating that it has successfully connected to an LTE network
- Enter the Device IMEI you wish to connect to
- Press Add device at the bottom of the dialog
- Click the button on your Device to complete pairing
- The Device should now show up within the Devices tab
The following video shows detailed step by step instructions on how to connect your Device to Superstack.
Deployment tab
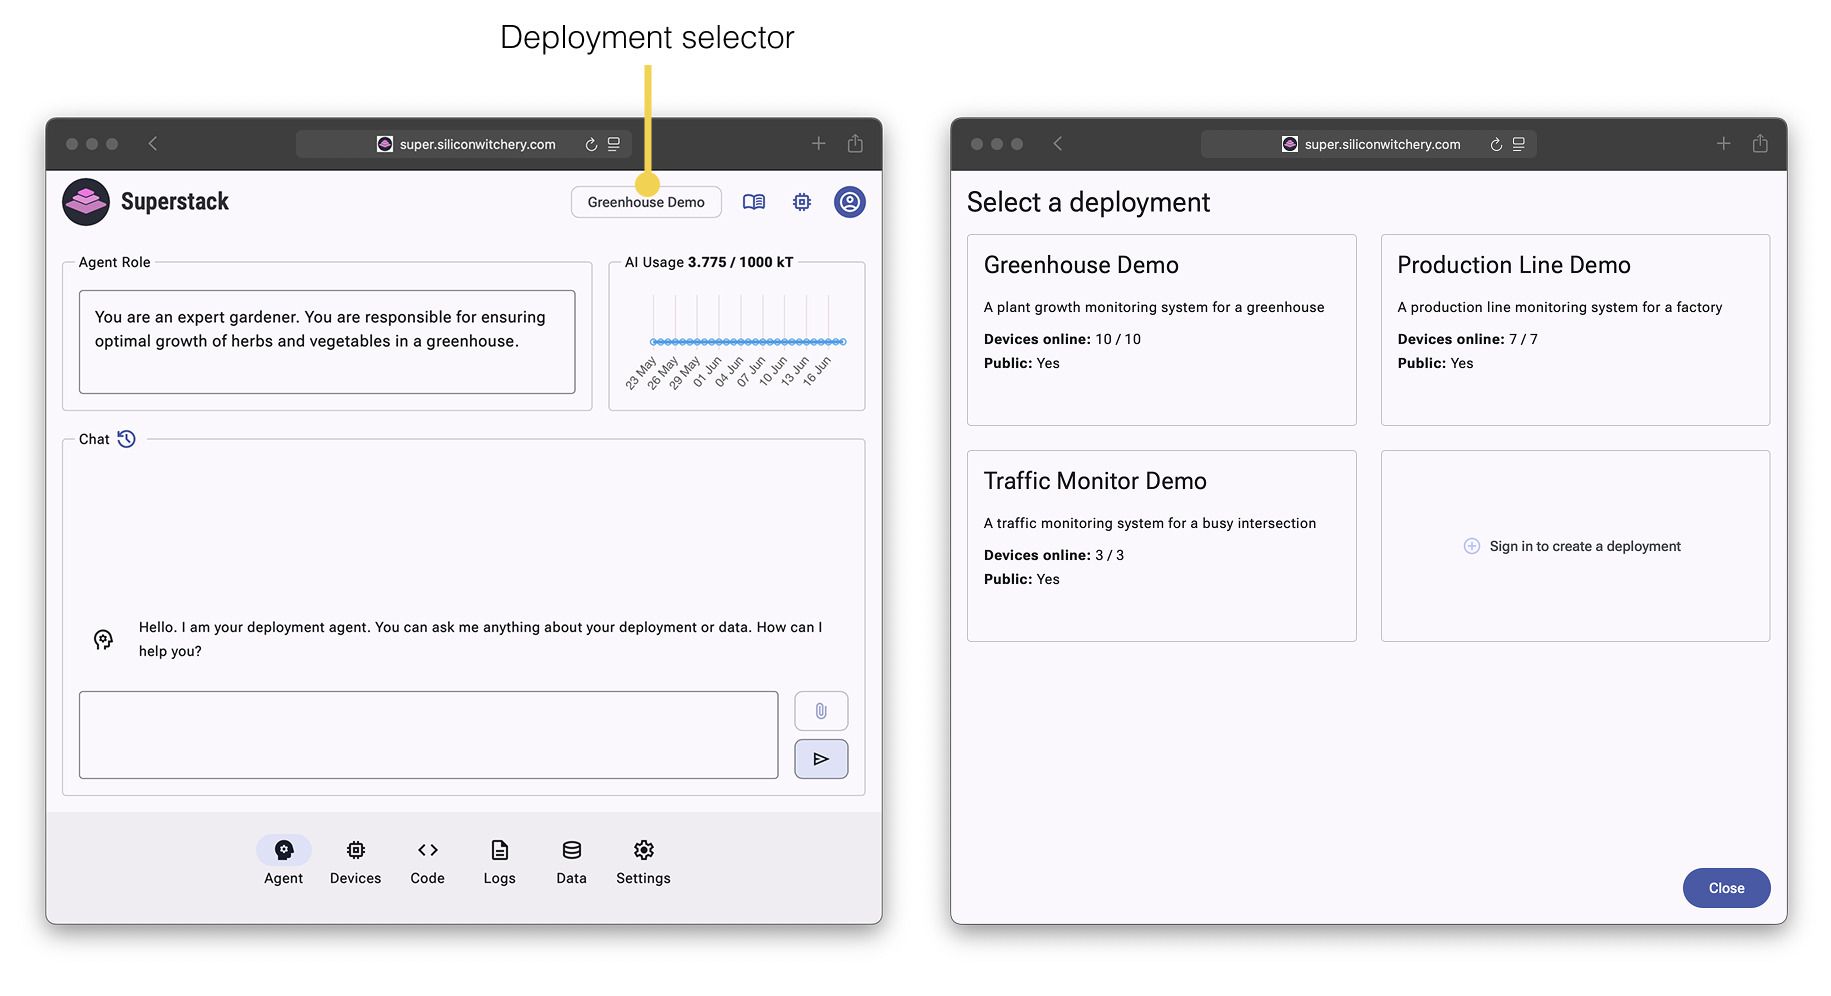
Deployments are the top level entities within Superstack. You can think of them as similar to “projects”. If you are signed in, the Deployment Selector is where you can create or select Deployments that are yours, or you are a part of.
If you are not signed in, you will be shown the Demo Deployments where you can explore the features of Superstack.
Devices tab
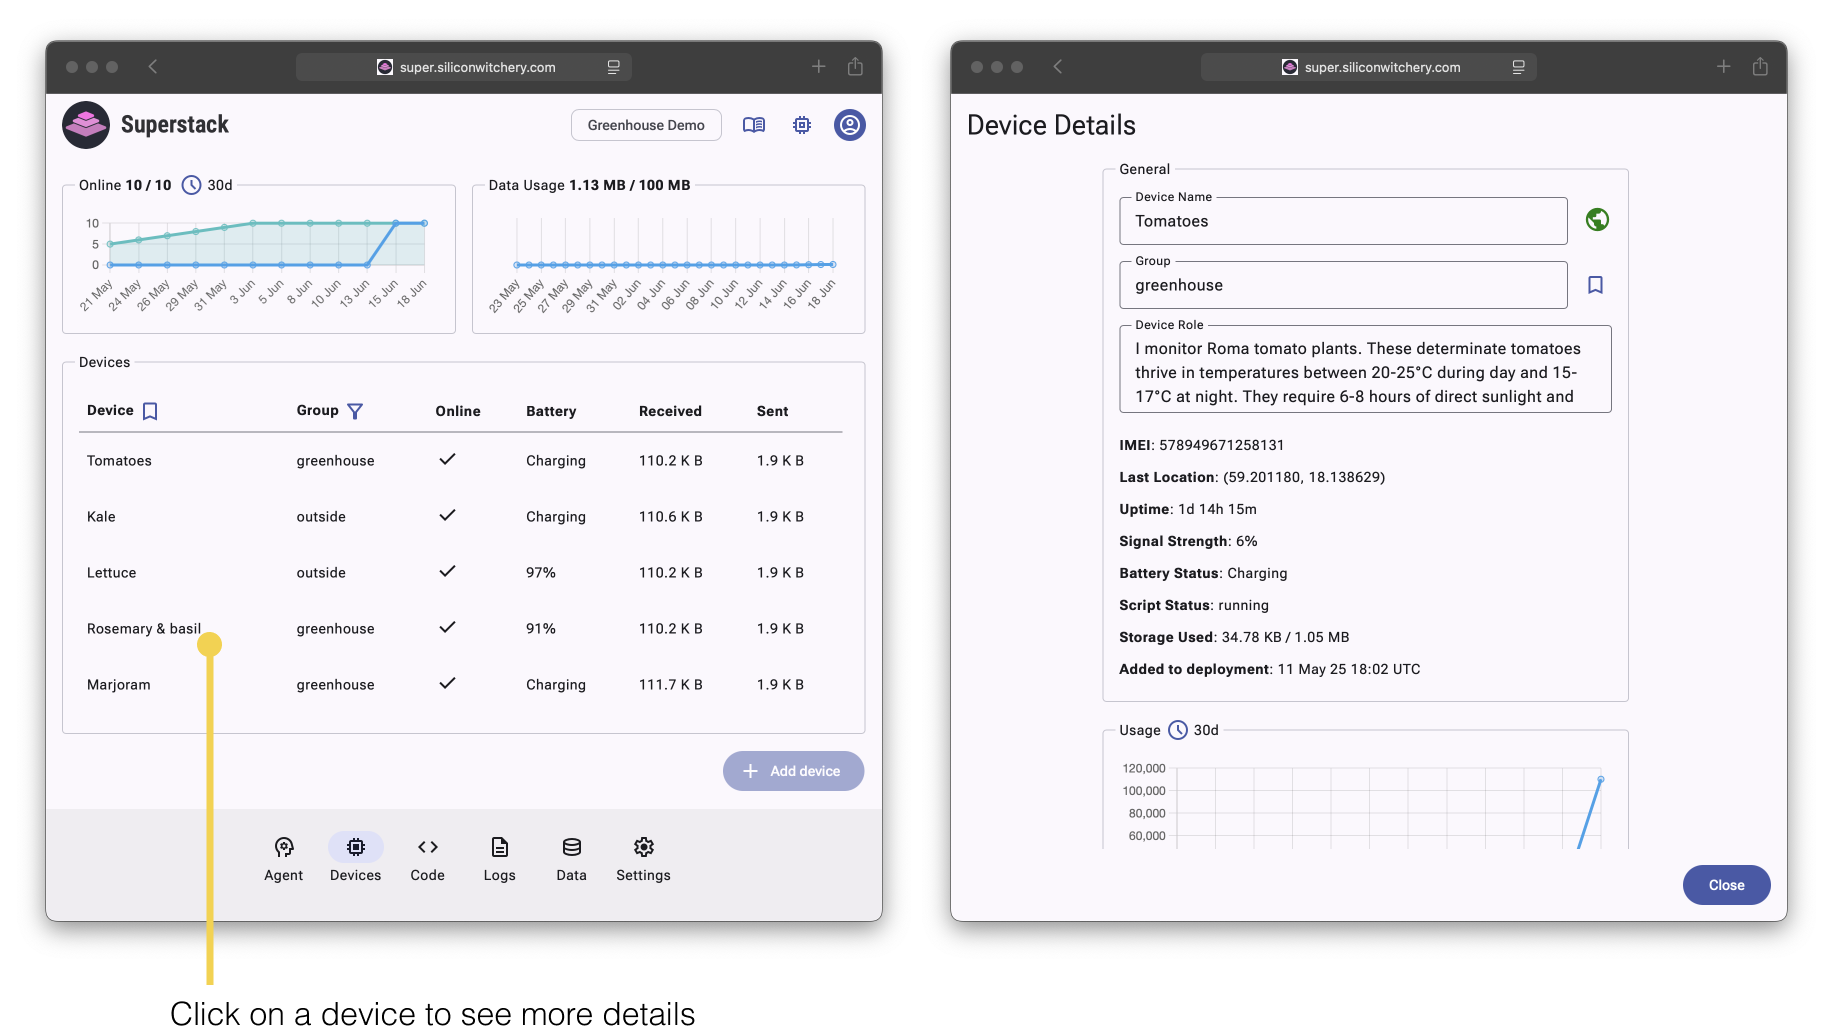
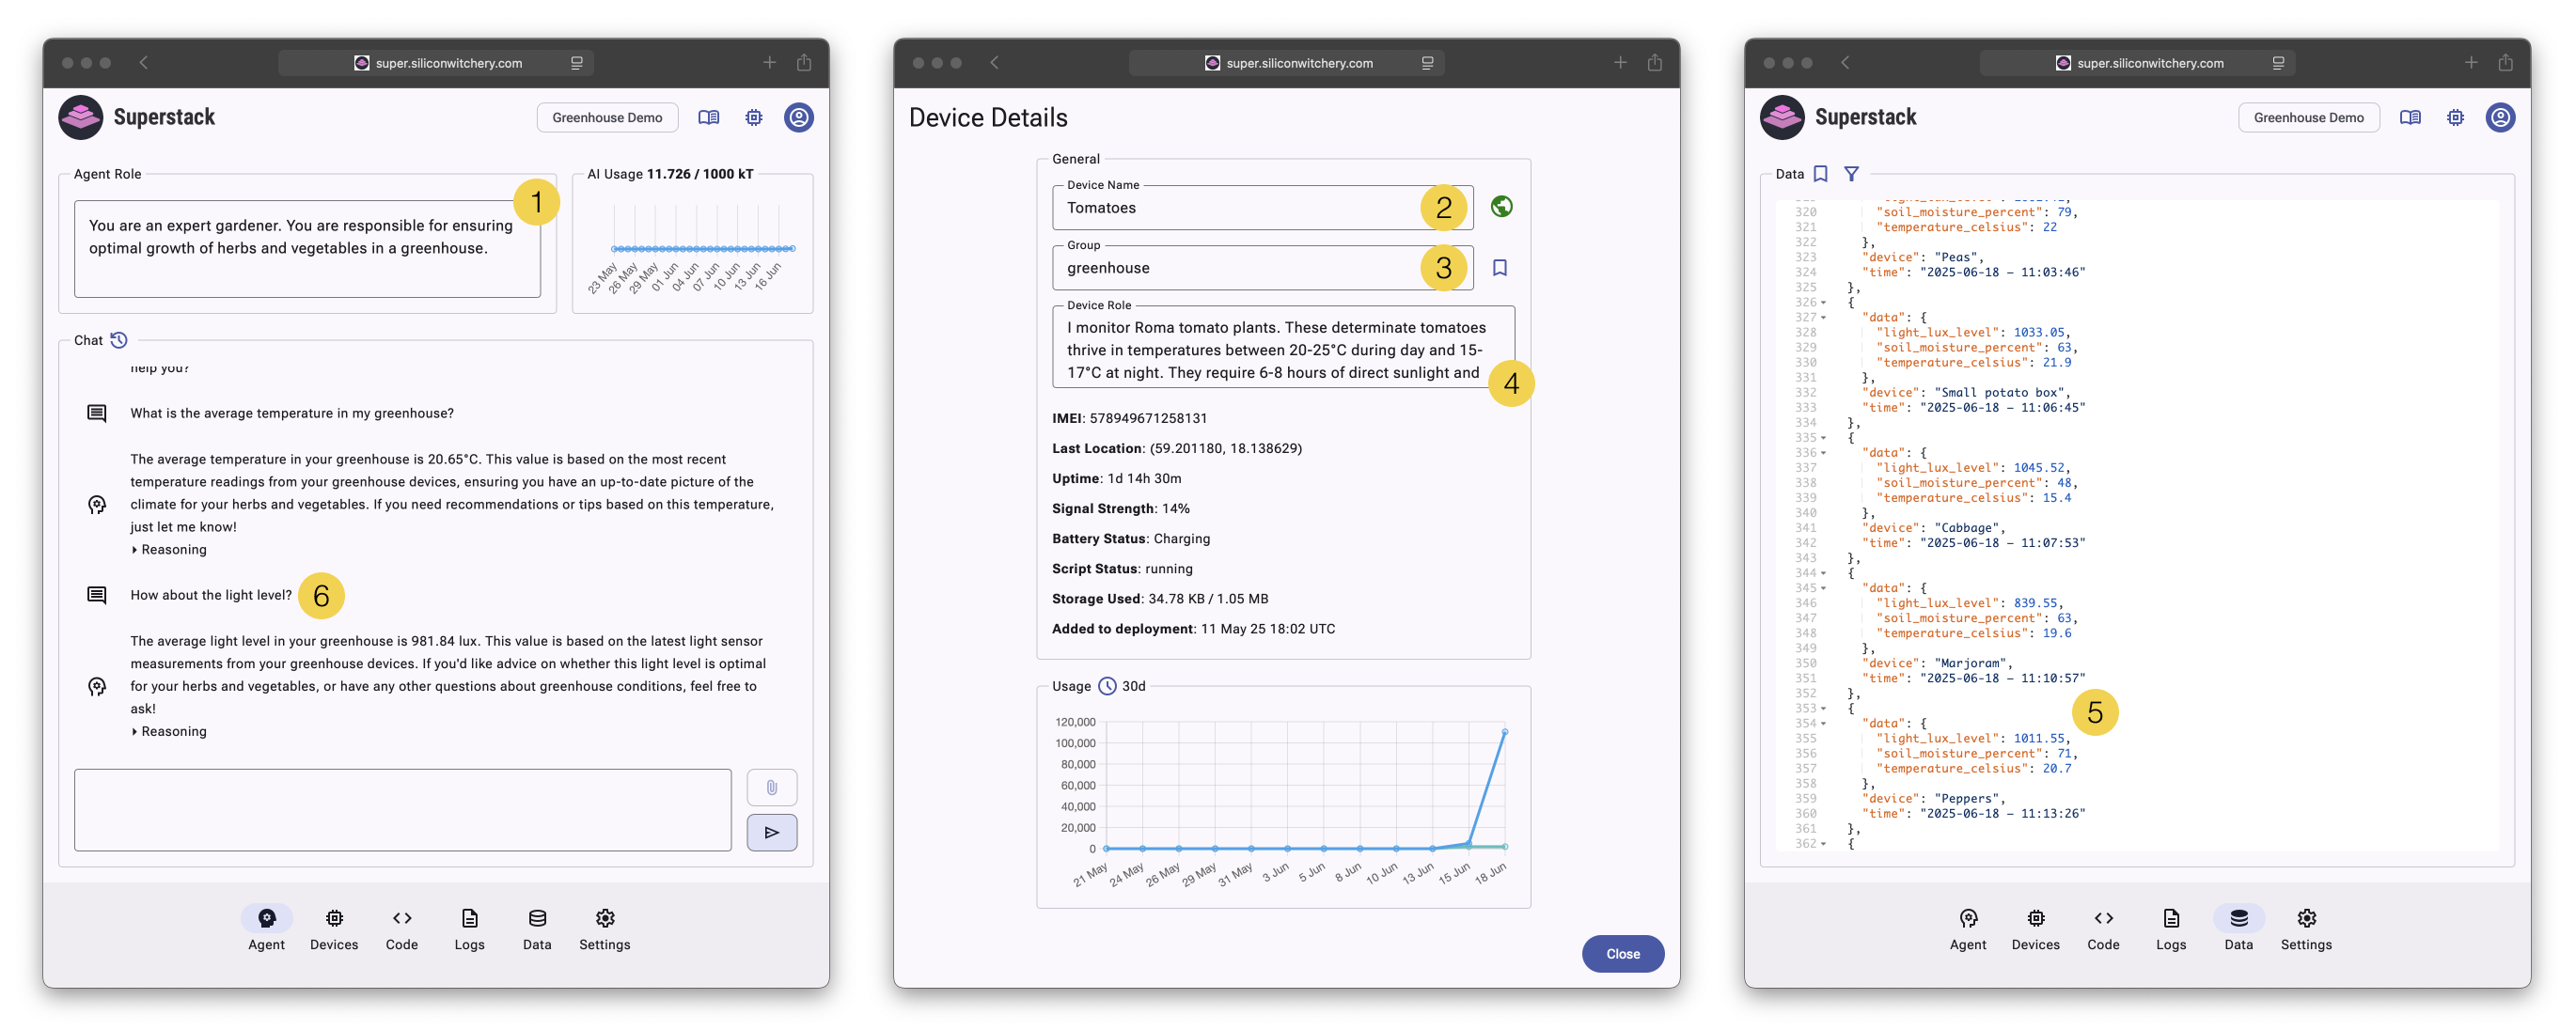
The Devices Tab lets you add Devices, such as the S2 Module, to your Deployment. On this tab, you can monitor and manage all of your Devices.
Clicking on a specific Device will reveal the Device Details panel. This panel shows Device metrics and allows you to edit the Device Name, Group and AI role. Here, you can also remove a Device from the Deployment.
Adding a device
A Device can only be a part of one Deployment. To add a Device, click the Add Device button and enter the IMEI number shown on the back of your S2 Module.
Follow the steps shown to confirm pairing from the Device.
A number of Devices up to the Device Limit can be added to a Deployment. This Limit is determined by the Subscription Plan associated with that Deployment.
Removing a device
If you no longer wish for a Device to be attached to a Deployment, or if you wish to move the Device to a different Deployment, you can remove it.
Un-pairing a Device will delete all the associated Data and Logs for that Device.
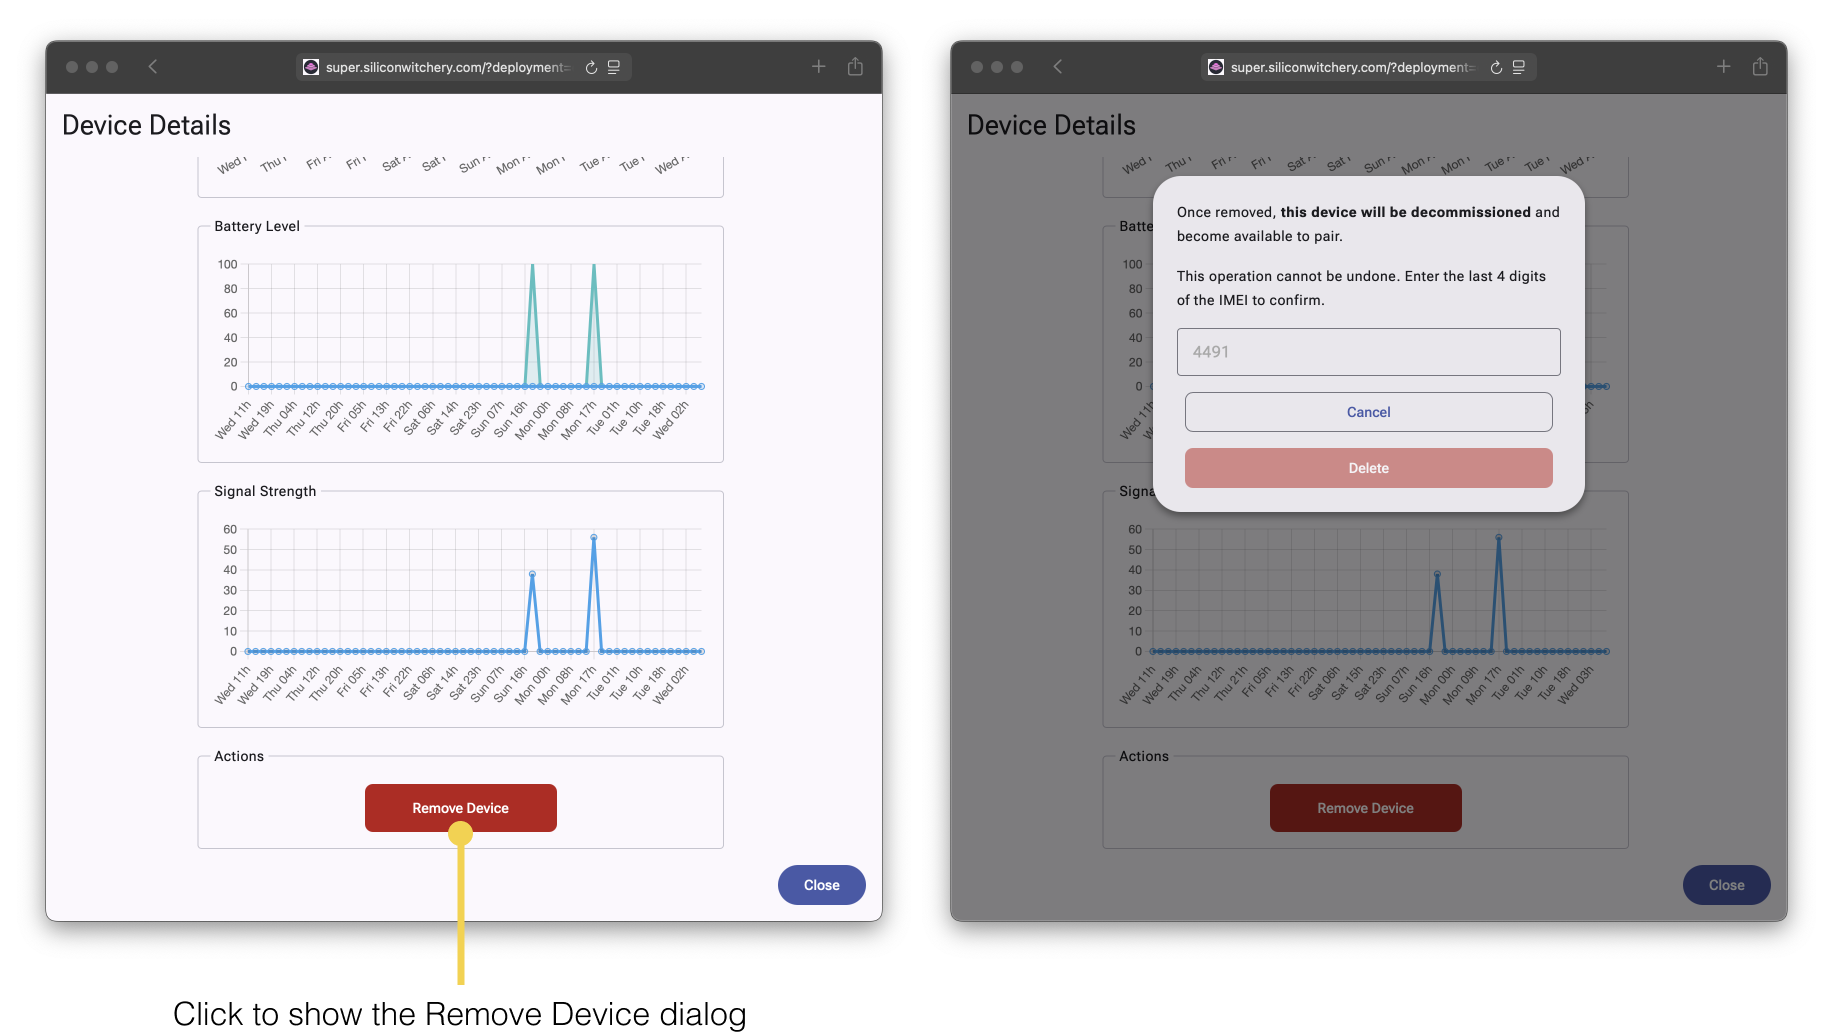
To remove a Device, click the Device in the Devices Tab to reveal the Device Details. Then scroll to the bottom and click Remove Device.
Once removed, the Device will immediately become available to pair. Anyone with physical access to the Device will now be able to attach it to their Deployment.
Understanding data usage
Data Allowance for Devices is measured on a Deployment level, and is determined by the Subscription Plan associated with that particular Deployment. All Devices share a common data pool which means that you don’t need to worry about individual limits per device, only the Deployment as a whole.
The Data Usage Graph on the Devices Tab shows the usage for the current Billing Period. At the start of the next Billing Period, this usage is reset.
Typical data usage examples:
- Single device sending a temperature value every 15 minutes: ~0.5MB/month
- Two devices sending a temperature value every 15 minutes: ~1MB/month
- Single device sending events every time a home presence sensor detects motion: ~0.25MB/month
All three examples above fit perfectly within the Free Starter Plan. For more frequent data transmission or additional devices, consider upgrading to a paid plan.
What counts as data usage:
Both data sent to and received from Devices count toward your usage limit:
- Logs sent using
print() - Sensor values or any other data sent using
network.send_data() - Changes to Lua code
Automatic module firmware updates, or viewing Device telemetry from within Superstack such as power, data usage, and location do not count towards data usage.
Code deployment impact: When you update Device code through Superstack, the entire code file is transmitted to each Device. Large code files can consume significant data allowance, especially when deployed to multiple Devices.
Devices record their own usage: Data usage cannot be reset by re-adding or moving a Device to a new Deployment. Device usage carries over with the Device.
Code tab
The Code Tab allows scripting of Devices to read sensors, toggle IO, and run algorithms using a popular scripting language called Lua. Lua is incredibly simple even compared to languages such as Python. Due to its small size and simplicity, it is used in many large projects such as Wikipedia and Redis, as well as massively multiplayer online games such as Roblox and World of Warcraft.
The Superstack Lua engine allows for remote, and realtime development of IoT code without having to write C firmware, learn about realtime operating systems, or manage over-the-air firmware updates that risk bricking your Devices. Simply write your code in the Code Tab Editor, save, and test. If something didn’t work, edit the code and save again. Your changes take effect within seconds.
To start editing the Code for a Device, click the memory icon and select a Device. The Editor will help you with formatting and point out syntax errors automatically. Click the save icon to save your code. Your Device will receive the code within a few seconds and run.
If you wish to push the same code to multiple devices, click the upload icon and select the Devices or Groups you wish to push this code to.
The push feature will overwrite any existing code on the selected Devices.
Detailed examples along with the Lua Library Reference can be found here.
Logs and Data tab
The Logs Tab and Data Tab display realtime user-defined messages and data sent from each Device. Logs are sent using the Lua print() function, and Data is sent using network.send_data().
Logs and Data can also be individually deleted using the delete icon.
Agent tab
The Agent Tab lets you query your Devices and Data using natural language. It’s additionally capable of running advanced statistical analysis using its reasoning capabilities.
The AI Agent takes its context from a number of sources.
- Agent Role - Determines the overall goal of the AI Agent
- Device Name - Informs the AI Agent what the specific Device is monitoring
- Device Group - Informs the AI Agent how the various Devices may be grouped together
- Device Role - Details specifics around the Device, its sensors and additional information which may be useful analysis
- Data Schema - Extracted from the Data within the Data Tab where the keys of the JSON, as well as the types can help reinforce the context of what the Data represents
- Previous Chat Context - The history of previous natural language queries may be used for context. For example, when asking a follow up question
For accurate responses, it’s recommended to use explicit details where possible. Avoid ambiguous technical names, and instead include complete and domain-specific information, which can help the AI Agent understand the context behind natural language queries.
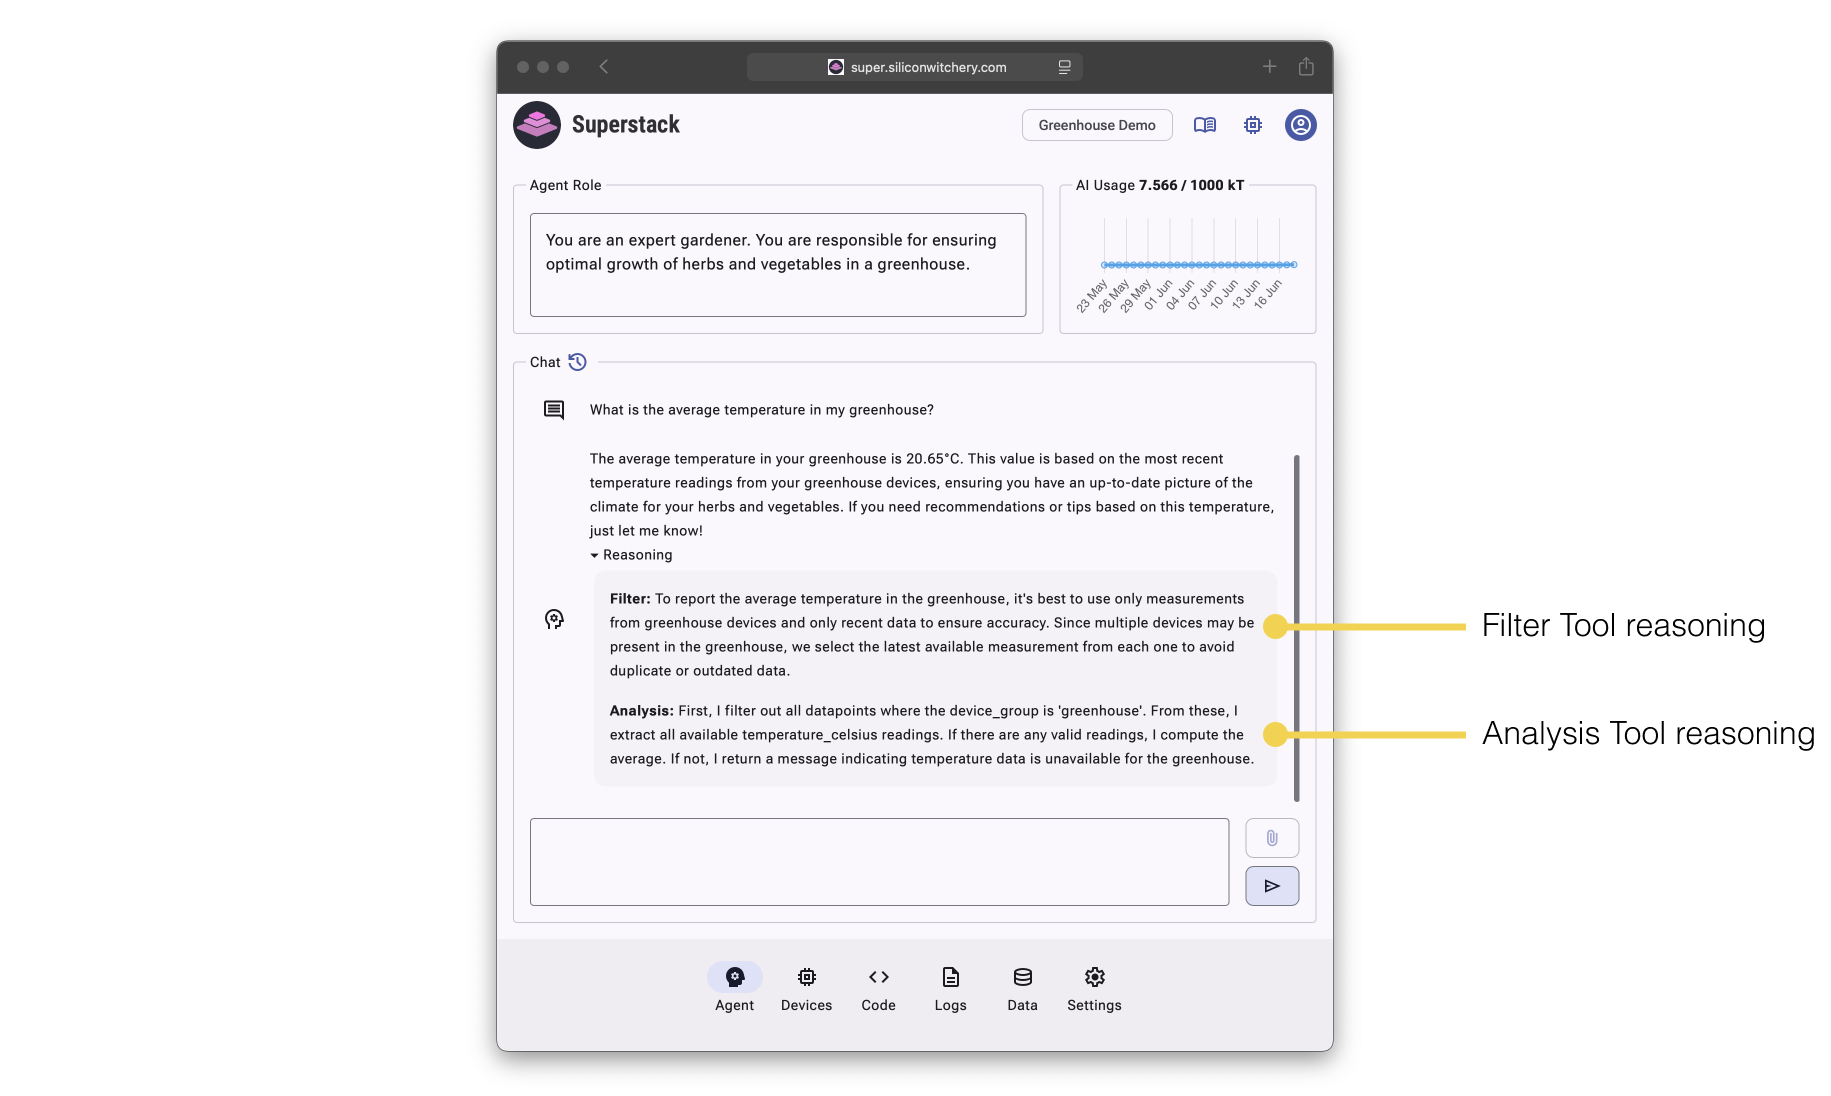
Responses run as an agentic multi-step process. A breakdown of the reasoning for each response is available for the User and can help verify logic, or debug failed responses.
- Filter Tool - Based on the query, the Filter Tool determines exactly which rows of Data are mathematically relevant before running the Analysis Tool
- Analysis Tool - Takes the result of the Filter Tool and compiles executable logic which runs numerical analysis on the Data
- Explain Tool - Explains the result with domain specific content as determined by the Agent Role and such that it is understandable for the User
AI Allowance is measured on a Deployment level, and is determined by the Subscription Plan associated with that particular Deployment.
The AI Usage Graph on the Agent Tab shows the usage for the current Billing Period. At the start of the next Billing Period, this usage is reset.
Settings
The Settings Tab contains all Deployment related settings such as Name, Description, Subscription Plan, Users, API Keys and Visibility.
Managing your subscription plan
The Device Limit, Data Allowance, and AI Allowance is determined by the Subscription Plan. Plans are per Deployment, therefore multiple Users of the same Deployment gain the same benefits when a Deployment is upgraded, and organization managers do not need to manage per-User billing.
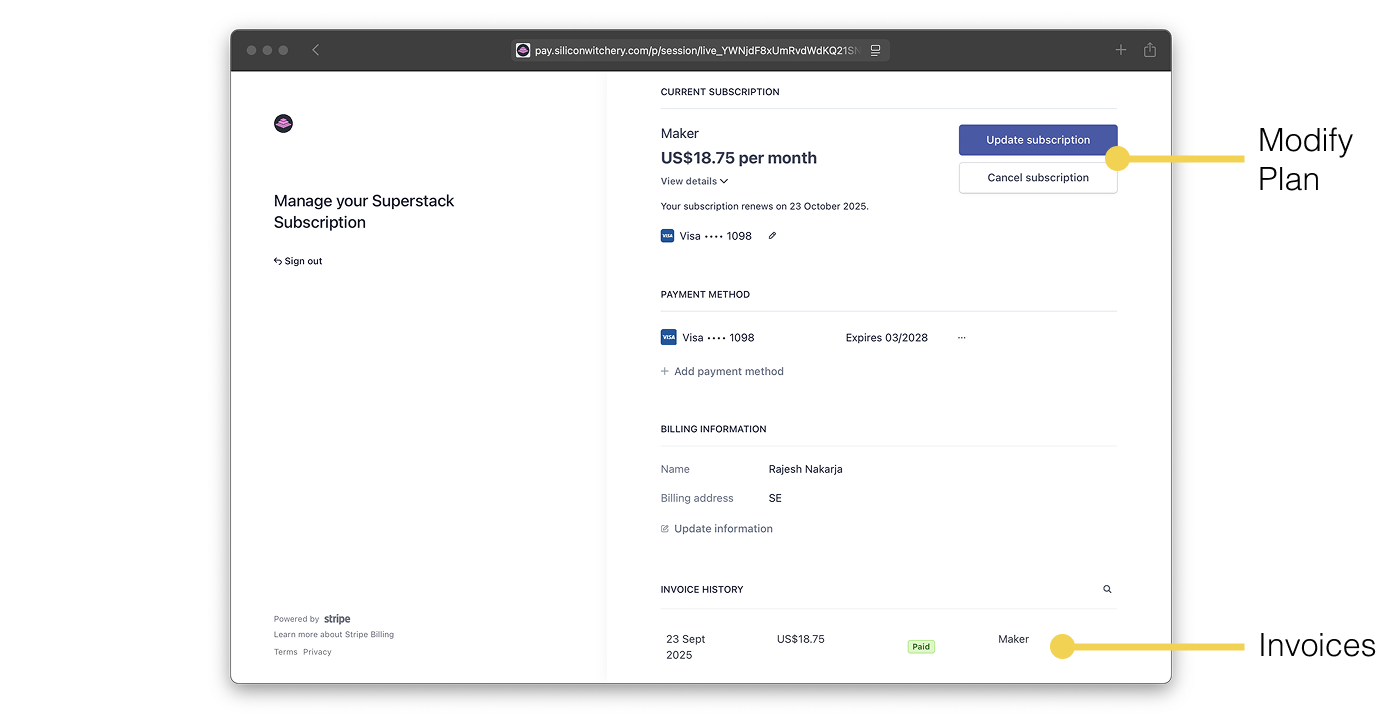
The Plan can be changed at anytime using the Edit Plan button on the Settings Tab. Payments are managed using Stripe, a well-known payment provider. The Superstack app does not handle transactions directly. Instead, Stripe securely processes all payments. Silicon Witchery does not store or access any sensitive User billing details.
The Data Usage and AI Usage resets at the end of each Billing Period. This is the day of the month that the Deployment was created. For example, if a Deployment was created on the 12th of September, the Usage will reset on the 12th of October. If a Deployment was created after the 28th day of the month, the Usage will reset on the 28th of the following month.
To view invoices, navigate to the Settings Tab → Edit Plan → Modify Plan → Login to Stripe and then scroll down to the Invoice History.
Adding and managing users
Multiple Users can be added to a Deployment and given specific Permissions. To add a new User, they will need to have signed into Superstack at least once. After that, click Add and enter the email address associated with their sign in. Once added, the Deployment will be visible for them in the Deployment Selector.
Click the edit icon next to a User’s email to modify their Permissions, or remove them from the Deployment.
Creating and managing API keys
API Keys follow the same Permissions structure as Users and can be used for making REST API requests to Superstack. Click Create to create a new API Key and check the desired Permisions.
Click the edit icon next to the Key name to modify Permissions or delete they key.
Deployment visibility
By default, Deployments are created as Private. Only signed-in Users who are a part of that Deployment can access it.
A deployment may be toggled as Public at which point Users which are not a part of that Deployment will now be able to view the Deployment via the Deployment URL. The following Permissions for the Deployment become public:
- Read deployment name and description
- Read device name, description, roles, status, usage and location
- Read device code
- Read device logs
- Read device data
- Read agent role and usage
- Interact with agent chat
Public API access without the need for an API Key will also be granted on the above.
Transferring and deleting deployments
To transfer a Deployment to a new User, add them to the Deployment with all Permissions enabled. After this, they will be able to remove you from the Deployment and take ownership of it.
A Deployment can be deleted using the Delete Deployment button found at the bottom of the Settings Tab.
Deleting a Deployment is permanent: All Device Code, Logs, and Data will be permanently deleted. Devices will immediately un-pair. Anyone with physical access to these devices will be able to attach them to their Deployments.
API
Superstack exposes all functionality found within the Web App as REST APIs for easy integration with customer applications.
See the full API documentation here
Troubleshooting / FAQ
While trying to set up my Device, the LED won’t stop blinking.
This indicates that the Device is not finding any LTE network to connect to. You may need to reposition your Device in order to receive better signal strength. Additionally, make sure that your country is supported within the Device network list.
While trying to set up my Device, the LED stops blinking and doesn’t seem connected.
This may indicate that either the power to the Device is insufficient, or that the Device is already connected to an active Deployment.
My Device seems connected to a Deployment but I don’t have access to it. How can I re-pair it?
Access to the original Deployment is required in order to decommission a Device for re-pairing. This is to prevent unattended Devices being taken over without explicit permission of the Deployment owner.